April 30, 2012 - Harvest Monday and Garden Happenings

Thinking back on last year's garden, I thought I'd misjudged the amount of lettuce we would be needing and didn't plant enough.  It seemed as though I was harvesting tons of greens by May 1st, but I just checked my May 5, 2011 harvest post and I'm actually right on track, and ahead on the total harvest this year by nearly a pound!  Of course, that would be mostly in radishes.  It's a good thing Mr. Granny loves them in his salads.  He has been raving about them, and to a slightly lesser extent the spinach.  He's never been much of a fan of garden lettuce, preferring a crispy iceberg from the grocery store, so I make his salads with a combination of store bought and home grown.  

Speaking of spinach, mine has disappeared.  The seedlings I transplanted are doing fine, and those have been our only source.  The seeds I planted in the former strawberry bed all sprouted in just a few days.  They looked great.  Then they disappeared.  By yesterday, out of two 6' rows of spinach, there was one tiny seedling left.  Radishes and beets have also been disappearing in that bed, but not quite to the extent of the spinach.....yet.  I have no idea what's happening.  The bed is covered with netting, so I can't blame birds.  I'm waiting to see if the three rows of carrots germinate and survive, so if they aren't showing by mid-May I'll just dig the bed and see if maybe it's an infestation of the wire worms that plague some of my garden beds.  If it is, I'll just have to live with the destruction, as I refuse to poison the soil.  I don't know if solarizing the bed would kill them or not, but I suppose it would be worth a try.

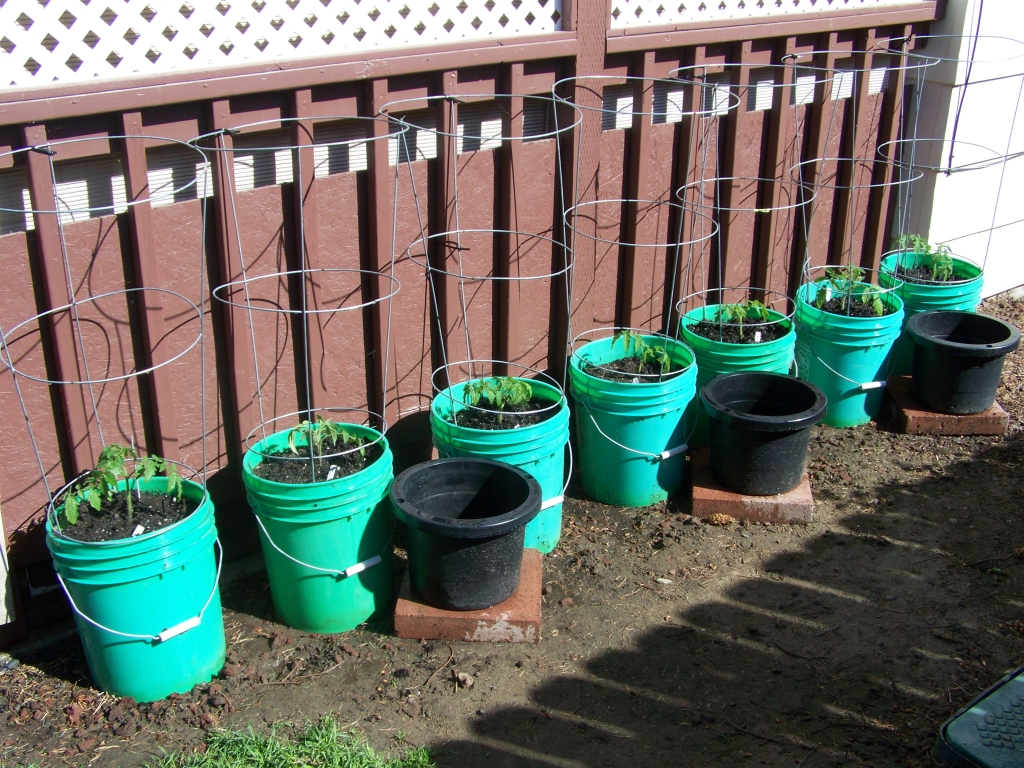
It's been a busy couple of days in the garden.  All of the tomato buckets (and containers) have now been set up, firmly secured, filled with a combination of potting mix and compost and planted.  I ended up with a total of 18 tomatoes in 13 buckets and three large bottomless containers, with the final two plants being planted directly into the garden sans pot or bucket.  I decided to use the 3 large black containers next to the shed, as the soil stays rather cool inside the cherry timber enclosure and the black pots will help keep the tomato roots much warmer.  That shed garden ended up with all of the tall cherry tomatoes (4), with a Marglobe Supreme in the center, under the window.  The cherries are (1) Black Cherry, (1) Isis Candy and (2) Una Heartsock.  Along the west fence, I planted (1) Fabulous, (1) Marglobe Supreme, (1) Homestead, (1) Bush Celebrity (1) Marion and (1) Bloody Butcher.  They join the previously named varieties in "Tomato Alley", which are (1) Victor, (1) Bloody Butcher, (1) Coastal Pride Orange (1) Homestead (1) Bush Celebrity, (1) Rio Fuego and (1) Mountain Princess.  Of course, in pots on the patio, I still have my four Minigold tomato plants that have been bearing fruit for a couple of weeks now.  That's a total of 22 plants.

After the tomatoes were planted, I started on the peppers.  Three containers in "Tomato Alley" were filled with potting mix/compost and planted with (1) Dave's Happy Yummy Hot, (1) Early Jalapeno and (1) Dave's Happy Yummy Sweet.  Then on to the garden where I installed ten small tomato cages and zip tied them together, then planted (2) Quadrato Giallo D'Asti -yellow, (2) Horizon Orange, (2) Quadrato Rosso D'Asti - red, (2) Red Marconi and (2) Corno Di Toro - red.

During the night, we had a lovely rain that helped settle in all the new plants.  Now we're having strong winds to dry up the soil and batter those new plants.  They've been outside for at least two weeks now, so hopefully they can take the weather extremes.


Harvest for the week of 4/23 through 4/29


Lettuce 7.2 ounces
Radishes 13.2 ounces
Tomatoes 1.5 ounces
Spinach 5.5 ounces
Total for week: 1.7 pounds
Total for year: 2.6 pounds


Ooops!  I forgot to mention Harvest Monday is hosted by Daphne's Dandelions. Hurry over to her blog to see what others are harvesting!

April 26, 2012 - "You have a garden, don't you?"


"You have a garden, don't you?"


Why, yes. Yes I do. How did you know?

I actually went to the grocery store in my gardening clothes the other day, and happened to look down at my knees.  They weren't this dirty, but there was definitely evidence that I'd been working in the garden that day!

Yesterday was spent digging the first of my two corn beds.  I won't have to actually dig bed #2, but bed #1 just happens to be in an area that was previously lawn, and contained a patch of Bermuda grass.  When we rototilled the new garden plot, of course the grass roots were broken off and distributed all through that entire area in the garden.  Each little (and sometimes big) root is now sprouting, so I'm trying to get them all dug out before growing crops cover them.  The corn bed was particularly bad, so I dug down a good 8-10" and sifted the soil through my fingers, pulling out every piece of root I could find.  It took the better part of the day to complete this 7'x8' section.  Then I planted it with corn seeds.  Of course, the sprouting corn and the sprouting Bermuda grass will be almost identical, so I can only hope I got most of the grass roots out of the patch.  Fun, huh?


The roots of all evil.

My indoor sprouted corn was a bust.  Of the 36 or so plants that sprouted, only about six survived. I had run out of the "potting mix that shall not be named", so I used a bit of potting soil that I'd originally purchased (and not had very good luck with) and mixed it with some peat moss and compost.  All of the corn sprouted, but it turned brown on the tips and withered.  Other seeds planted in that same mixture have failed to germinate at all.  That would include my Grandpa Ott morning glories (some were direct seeded in the garden, thankfully), the Honey Bear squash and cantaloupe.  Marigold seedlings that were up-potted into that same mixture also turned brown.  Note to self:  do not buy cheap potting soil at Lowe's, and follow your own advise to never use potting soil, only potting mix.

I had to do a bit of fence alteration yesterday.  As you know, I used the plastic mesh fencing around the garden, and put a 1' high strip of welded wire fencing all along the bottom to keep Annie from going underneath.  Otto has never tried it, but Annie would go under any chance she got.  Well, she discovered she could push the wire fencing up just enough to get her body under it, then push up on it hard enough to bend it, then get in and out of the garden again.  I removed the welded wire from the section she destroyed, and replaced it with folding wire fencing held in place firmly with bamboo stakes.  I don't think she can push up on that!  Eventually I'll probably replace all the welded wire fencing, it's just too flexible to withstand the force of Annie.

It's rainy, but warm, today.  It looks like I'll get a day off from gardening so I can do something constructive....like cleaning floors, dusting furniture and vacuuming carpets.  YUK!  But first I'll brave the rain and take a few pictures of the garden.....


Onions and potatoes are looking great!


Sugar snap peas are beginning to climb, oregano loves the spring rain, lettuce (in the background, inside "The Thing") is giving us a couple of salads a week.


Rows from left to right are dwarf cabbages, celery and two beds of carrots.  Nothing is planted between the bamboo sticks, but it will soon be planted with more carrots.


Peas are beginning to grow up their tepee trellis, radishes are being harvested every couple of days.  Broccoli is finally beginning to grow, but garlic is not doing well after being transplanted.  Beets are popping up in the foreground, and flowers have been planted in between the vegetables.  In the covered bed, the beets are growing large, I'm harvesting a small amount of spinach, and the onions grown from seed are still doing next to nothing.  Turnips in front of the bed are growing very fast.  All of the perennial flowers along the fence are looking really good, and much larger than they were this time last year.  Zinnias planted last week are still very happy here.


Behind the shed, the zucchini and yellow crookneck squash are happy campers.  I drilled some small holes in an old hose and coiled it around the squash, under black plastic and straw, so this bed can be watered without getting the squash leaves wet.  I'm hoping that will foil the powdery mildew that usually ends my summer squash season early.


The garlic that was transplanted here is doing much better than what I put in the triangle beds.  Four varieties of basil are growing in the pots, with parsley under the ladder.


My hybrid cantaloupe seeds haven't yet germinated, but I had no trouble getting seed saved from a grocery store cantaloupe to sprout.  I'll also plant a few of the packaged seeds near these, and if they do grow I'll probably pull these out, as I have no idea if they would be true to the parent melon (which was exceptionally good).  I may even just let both varieties grow and see what happens, as they don't take up an awfully lot of room like the squash.


April 25, 2012 - Tomato Alley

Yesterday, after I got the mess from the windstorm cleaned up, I ended up mixing up potting soil in the wheelbarrow for the buckets in Tomato Alley.  I was going to use the large dump cart, but decided it would be too difficult to move soil and amendments out of the corners.  It only took two wheelbarrows full to fill the seven buckets in that row.  I was too tired to mix up more for the black pots, which will eventually hold hot peppers.


From left to right, I planted (1) Victor (from Ed). (2) Bloody Butcher (from Mr. H. 2011), I planted this variety in 2011 and it earned a spot in this year's garden. (3) Coastal Pride Orange (also from  Mr. H. 2011), another winner from last year's garden.  (4) Homestead (from WinterSown SASE 2009), I plant this one every year, as it's dependable and I love the flavor.  (5) Bush Celebrity (WinterSown SASE 2012) first time planting this variety, but I used to always plant Celebrity and like them.  (6) Rio Fuego (WinterSown SASE 2012) first time planting this variety.  (7) Mountain Princess (from Wendy 2012) first time planting this variety.

Next I dug multiple roots and suckers from around the lilac tree, making a nice soft flower bed for some zinnias.  I got a bit carried away with planting zinnia seeds this spring, and they are not only outgrowing their containers, but many are getting flower buds.  I found room for 16 plants under the lilac.  I have no idea what I'll do with the remaining plants.


A half circle of Lilliput and Sprite zinnias on each side, and to the rear of, the barrel.  I have two leftover broccoli plants that will fit behind them against the chain link fence.  I had planned on Honey Bear squash in the barrel, but it might be sweet potatoes.  It depends on whether the potatoes have slips in time (I doubt they will).


April 24, 2012 - Enough Already, Mother Nature!

It wasn't bad enough that Mother Nature hit us with a record breaking 91F yesterday, but she had to show her temper later in the evening with thunder, lightening, rain and wind gusts up to 62MPH!  Look, Mother, I've been pretty forgiving so far, but I have cleaned up the mess in the front yard four times this spring.  I'm old.  I'm tired.  Enough is enough!


This was after we had picked up the large branches.  Pine tree litter covered the entire front yard, driveway and porch.  It's still on the roof, so once I can find someone brave enough to go clean it off, I'll have to clean all of that up too.


 The way the wind has blown this year, I'm wishing I'd purchased stock in black plastic leaf bags.  I've certainly had to fill a lot of them.


The mess comes from three of these monsters on the west side of our front yard.  I have a love/hate relationship with them.  I love their shade, but I hate their messiness.


The sudden heat wave really forced the lilac into full bloom, so my lilac season will be rather short lived this spring.


The blossoms smell delightful.  They perfume the air all over the back yard.  Which is nice when you live with two poopy dogs  ;-)


April 23, 2012 - The Bucket Brigade Begins

*Post #2 of 2 for today*

It's time to get the bottomless tomato buckets ready for the season.


First I hosed them all out to remove the loose dirt.  Then I filled a non-bottomless bucket with water, and added about 1/2 cup of chlorine bleach.  That's probably at least double the bleach is really needed, but I always tend to overdo things.


Then I submerged each bottomless bucket into the bleach water, and used a long handled brush to clean around the top where the water didn't reach.  I left the bottomless bucket in the bleach solution for about five minutes, then removed it and let it sit in the sun to dry while I soaked and scrubbed the next one.


I lined the buckets up on the west side of the patio.  A heavy duty tomato cage was inserted into each bucket.  Usually I run the long wires at the base through holes drilled around the edge of the bucket bottom, down into the soil.  However, these buckets are sitting on lava rock, so I had to bend the wires and just fit them down inside the buckets.  Each cage was secured to a picket with heavy nylon cable ties, and then smaller zip ties were used to attach each cage to the one next to it.  A hurricane couldn't tip them over now!  I'm planting some compact growing tomato plants in these, so I placed them as close together as I could.


There was still plenty of room to walk through here, so I decided I could add three pots for hot peppers, too.  I don't like to put the hot peppers out in the garden, as it's too fertile and they get too much water.  They always end up being sweet rather than hot.  Everything down this "tomato alley" has to be hand watered, so I can control the amount of moisture the peppers receive.


Another six tomatoes can go here, against the fence.  I'll put the taller growing plants there, as they can be tied to the 1"x2" vertical posts.  The cages go down into the soil in this bed, and are attached to the posts with cable ties.  Just three more and the green buckets will all be ready to fill with potting soil.  I was just finishing up when son John came to help me with another project.

Don't forget to read about it in my earlier post #1 for today!


April 23, 2012 - Let's Do the Twist!

*Post #1 of 2 for today*


Son John came over this afternoon to help me with a little project.  I'm always laying a hoe, rake or shovel against the top of my plastic mesh fencing, and I was afraid I'd eventually tear it or stretch it out, and I needed something that would support a cucumber vine if I decided to grow one against the fence.  I also needed to replace the garden twine in the raspberry bed with something stronger.  John does this really handy thing, using his electric drill and wire.  We used electric fence wire, which doesn't rust, but you could use baling wire if you wished to.


I'm showing the instructions as done on the raspberries, but the same procedure is done on a fence post by making the loop around the top of the end post.  Here John ran one end of the wire through a  single drilled hole at the starting point, then through a hole (or around the end fence post) at the other end.


Then he looped it and ran it through the hole next to the first one (or around the end fence post).


Make sure your loop is tight in the back.


Pull the wire through, all the way back to the starting point,  until you have a double strand.  Add at least 2-3 extra feet to the length to account for the twisting, which will shorten the wire considerably.


Push the ends of the wire through a single hole at the starting point.


Clip the ends of the wire even.


Insert the ends into a drill and tighten the chuck until the wires are held firmly.


Turn on the drill, slowly, and the wire will begin twisting.  Continue twisting until the entire length is neatly twisted together.  Carefully and slowly release the wire from the drill, as it can sometimes recoil.


If you're doing raspberries, as we were, let this wire hang loose until all four are finished, then attach them one at a time to keep the tension correct on all four.  If we had turnbuckles, it would have made the job simpler.


Wrap the wire tightly around the support (or around the fence post).


Then loop it back around itself, making sure you have the ends tucked in so as not to scratch yourself on them.


After the raspberry wires were done, we made an 80-foot twisted wire and wove it back and forth through the top of the plastic mesh fencing, attaching it at each T-post.  Now I won't be sagging the fence fabric down with my garden tools.


April 21, 2012 - The (almost) First Harvest

Not counting chives, the lettuce that I grew inside and the one head of lettuce I pulled last week and didn't tell you about, this is kind of my first "real" harvest of 2012.

Guess what's ready.  Yep, the very first ripe tomato (and another close behind)!


The first Space spinach of the season, and it's beautiful.  I picked 4.7 ounces, and I wish there was more of it!


I pulled the first ripe Cherry Belle radishes, and picked that little Mini Gold cherry tomato.


It's so pretty, let's look at it one more time before Mr. Granny and I each take a bite.  Mmmmm!  It was actually good!  I never expect much flavor from the first tomatoes, they are usually bland and mealy, but this one was juicy and tasted like a real tomato!


The spinach made an excellent salad with a sweet and sour hot bacon dressing.  We ate it with grilled jumbo shrimp and baked potatoes.  I licked my plate when I was finished  :-)


April 21, 2012 - Granny Fears For Her Safety!


I bought some equipment for the garden yesterday, but I don't know if I'm brave enough to use it.  Each piece came with this dire warning attached:  !WARNING  To prevent injury: 1. Wear ANSI-approved safety goggles during use.  2. Inspect before every use: do not use if damaged.  Save these cautions.


What do you guys think?  Should I take a chance?

Is that beyond ridiculous or what?  That tag is attached every single little clamp!  The cost of attaching the tag probably exceeds the 49-cent price of the clamp.  Get real  :-0