June 30, 2011 - We Interrupt This Blog Series for an Important Announcement


We Interrupt This Blog Series for an Important Announcement


I probably shouldn't have done it. You're not supposed to harvest rhubarb in it's first year, but I couldn't help myself. I really wanted one of these.........


There wasn't enough for a big pie, but just over 3 cups filled an 8" pie pan just fine. Mmmmmm, I can smell it, it's almost ready to come out of the oven. It's not burning on the top, I just like a lot of cinnamon sugar on my rhubarb pie crust :-)


Done! I hope it tastes as good as it looks and smells. It's been a long time since I last had rhubarb pie. Too long.

June 30, 2011 - The Garden at the End of June (part 1 of 2)


Lots of pictures again, so I'm going to break this post into two parts.


The Kennel Garden


The Fortex beans are climbing up the kennel garden fencing, and beginning to blossom. A second planting of carrots are growing in front, after the first planting was leveled by slugs. A few shallots are begging to be dug from the edge of the bed.


One pole bean plant has gone over the top of the 6' fence.


Pickling cucumbers had to be replanted from new seeds after the first planting failed to germinate. I have three pots in various places along the fence.


Slicing cucumbers fared a bit better, although I lost the first two seedlings. This is the only pot of slicing cucumbers in the garden this year.


The Heavenly Blue morning glories are finally beginning to climb the fencing. I do hope they bloom this year after getting such a late start. There's a yellow crookneck squash behind the bench, which will eventually hide all the garden hoses in that corner.....if it ever gets large enough. It had to be replanted too, and is now the same size as the pickling cucumbers.


Nasturtiums and lobelia give some color to the kennel garden.


The East Garden


The east garden.


Bed # 1 (no photo): The pea vines have been pulled, and bush beans have been planted. However, for some reason I cannot get beans to grow here. They come up as leafless little stubs and disappear. I'm not seeing any slug slime, and the soil is nice and warm now, so this has me stumped. I'm going to try one more planting, with Sluggo sprinkled around and mesh over the top (in case it's birds).


Bed #2 - There is slug damage on the cabbages in this bed, so they may have wandered over to the newly emerging beans next door. The broccoli in this bed isn't giving enough side sprouts to bother with, so I'll be pulling it out this week. The storage type onions haven't bulbed up well either, they might get pulled and frozen for later use. That would clear up half the bed for planting a fall crop of something.


Bed #3 is the Walla Walla Sweet onion bed. Quite a few have already flopped over and been harvested, I expect the rest of them to flop by this weekend. If I can find some seed potatoes or organic potatoes from the store, I'll put them here. If not, this bed will probably be planted with fall lettuce, a final planting of carrots and more bush beans. The tomato plant in the foreground is a volunteer, probably a Minigold, and is covered with blossoms.


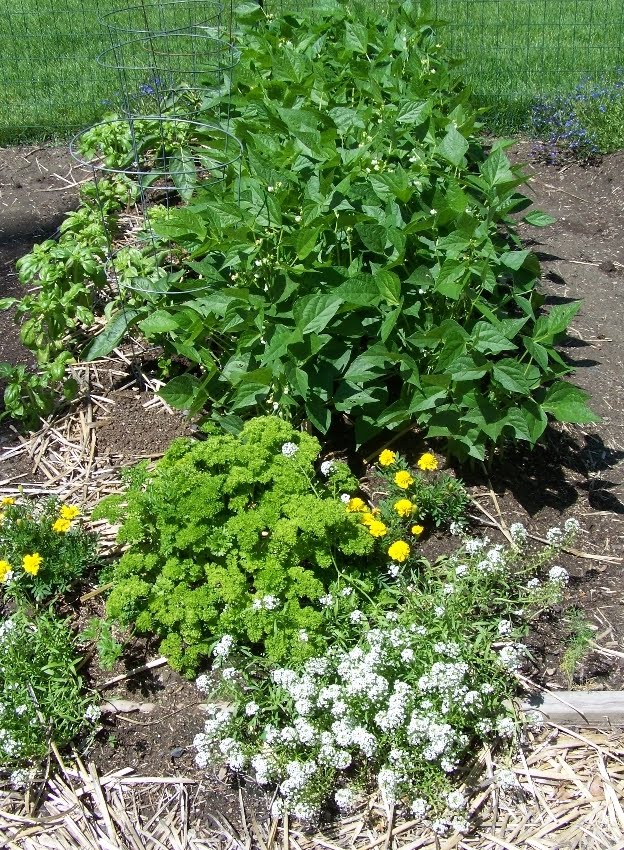
Bed #4 is giving us delicious baby carrots. Of the four varieties planted here, I'd say the Ingot Hybrid are performing the best and the Tendersweet the worst. Both Red Cored Chantenay and Nantes are somewhere in the middle on production. The basil in this bed isn't growing as well as in the other bed and pots. We won't even discuss the puny peppers. In years past, my peppers have been knee high, bushy and loaded with fruit and/or blossoms by now. I'm not holding out any hope for this year's crop.


Bed #5: The French Gourmet Green bush beans in this bed are the highlights of the entire east garden. I'll probably be picking them for tomorrow's dinner. The basil in this bed was just picked, and gave me a big basket full that has been banded and hung to dry. More peppers, puny and sickly, but there is actually one bell pepper for four plants. Yes, they've been fed compost tea and fish emulsion, but still no decent growth. I might buy a four pack or two before it's too late to get them planted.


The beans in bed # 5 should be ready to pick for tomorrow's dinner.


Bed #6 has the Rutgers tomatoes (3). They have just a few blossoms, and no sign of fruiting yet. In fact, the blossoms have been dropping from all three plants. There are a few carrots (spotty germination), and huge green onions that really need to be pulled and eaten....we tend to eat the sweet onions instead. These bush beans look good, and are beginning to blossom.


Bed #7 was recently divided into two beds. I'm finding, as I age, the 4' beds are harder for me to reach to the center. The new narrow bed on the right is filled with tiny carrot seedlings. These are from a new packet of seeds, as I think my older seed is losing viability. It only took about a week after Annie ripped the netting over the beets and chard for it to become full of leaf miners. Between that and the slugs, I'm ready to rip out the chard and go to plan 2 for the fall planting. There are more carrots, beets and onions emerging to the left of the beet row. We had roasted baby beets this week, and they were so sweet and delicious, I wished I had planted more....well, now I have. If the leaf miners want the tops, so be it. I'll be happy with the bottoms.


The Walla Walla Sweet onions that were pulled from bed #3 are hanging in the shed to dry, along with the basil that was picked yesterday. I can keep the doors and windows open for ventilation.


The top pulled right off of this one, so it came straight into the kitchen. At 9 ounces, it was one of the larger ones. That's quite a bit smaller than the ones I grew last year.


June 28 - Hanging it Up Addendum


Some of you have asked if Walla Walla Sweet onions are good storage onions. They are not a storage onion, and will only keep 3-6 weeks. Following are several ways to keep them.

1. Place Walla Walla sweet onions in the legs of clean, sheer pantyhose. Tie a knot between each onion and cut above the knot when you want to use one. Hang in a cool, dry, well-ventilated area.

2. Place them in the refrigerator, wrapped separately in paper towels or newspaper. This method takes up precious refrigerator space, but can preserve the sweet onions for a longer period of time.

3. Place them on elevated racks or screens, not touching and in a cool place.

4. They can be chopped and dried in the oven. Use the lowest setting and remove from the oven when thoroughly dry but not brown. Store at room temperatures in airtight containers.

5. They can be frozen. Chop and place in a single layer on a cookie sheet in the freezer. When frozen, remove and place in freezer containers or bags and seal. This method allows you to remove the amount you want when you want it. You can freeze whole onions. Peel, wash, core, then drop into a plastic bag. Once frozen, they can be removed like ice cubes.

NOTE: Freezing changes the onions' texture, so frozen onions should be used for cooking only. Whole frozen Walla Wallas can be baked.

6. If stored properly in a cool and well ventilated location, Walla Walla Sweet Onions will stay fresh for 3-6 weeks or they can be frozen for use well into the year.

June 28, 2011 - Hanging it Up


I guess I should have said "Hanging Them Up", but I wanted to get your attention.

Some of the Walla Walla Sweet onions began to flop over yesterday, so they had to be pulled. These aren't nearly as large as last year's crop, but if they had stayed in the ground they would have rotted. At least the larger ones haven't begun to flop over yet, and there are quite a few of them still in the garden.


This is the 2010 harvest of Walla Walla Sweets from July 2, 2010, so the harvest dates were fairly close. They are quite a bit larger, but much smaller in number. I probably have at least three times as many this year, even though I've already pulled quite a few for fresh eating. Last year I lost several by not pulling them as soon as the tops flopped.


It looks like there are a few more "floppers" to be pulled today.


June 27, 2011 - Harvest Monday


6/20 - Broccoli 5 oz., carrots 7 oz., parsley 4 oz., lettuce 16 oz., raspberries 3 oz.


Lettuce all cleaned and separated, half for us and half for the pet bunny. The lettuce is still sweet and crisp.


6/20 - Peas 10 oz.


6/21 - The first tomato 2 oz.


6/21 - Raspberries 6 oz.


6/22 - Kale 9 oz., lettuce 7 oz., peas 9 oz. One pint of dried parsley.


6/22 - Broccoli 3 oz., raspberries 9 oz.


6/23 - Cabbage 19 oz., carrots 4 oz., onion 8 oz., (not shown: lettuce 7 oz.)


6/23 - Parsley 16 oz.


6/24 - Raspberries 14 oz.


6/24 - Broccoli 4 oz., peas 8 oz., tomatoes 4 oz.


6/25 - Raspberries 20 oz.


6/25 - Peas 2 oz. That was the last of the peas, with only a very few blossoms left, so out they came to make room for the bush beans to grow.


6/26 -Raspberries 17 oz., tomato 2 oz.


6/26 - Lettuce 30 oz., (not shown: broccoli 2 oz.)

Total harvest for the week: 15.6 pounds
Total harvest for the year to date: 73.8 pounds

Please join in the Monday Harvest at Daphne's Dandelions!

June 26, 2011 - Dear Santa......


Dear Santa,

I promise to be a very good girl this year, if only you will bring me one of these for Christmas.


Love,
Granny

My oldest son, John, came over this morning to begin the sawing of the rafters. He brought this power washer with him, and between us we washed the house siding, the patio floor, the outdoor furniture and the patio (fiberglass) roof. Then we washed the house siding, the patio floor, and the outdoor furniture. No, that wasn't a typo. He power washed the roof after all the other stuff was done, so we got it all dirty and had to wash everything a second time! I absolutely love that power washer. I wish I could take it inside and clean my entire house, just like we did the outside!


Otto must be wondering how the patio got so clean! Some day I'll be all finished with the work out there, and then I can finally put the ladder away. Today I managed to get all that siding painted, and I'm nearly finished with the patio trim.


Here you can see what John's doing. Three down and only 36 to go! When he gets all of them cut, he'll be able to install a fascia board. I haven't yet decided if I'll have him put up soffits or leave the rafters exposed like they are on the rest of the house.

June 25, 2011 - A Pea is a Pea is a Pea. Or Not.


I did a stupid thing with my snap peas yesterday. I froze them, then vacuum bagged them, then wondered why they looked so different from the previous frozen ones....I had forgotten to blanch them! One had fallen off the tray onto the counter, so I picked it up and took a bite. It was terrible. Rubbery and bitter. Not only did I ruin 10 ounces of sugar snap peas, I wasted one of those expensive vacuum bags.

I'm not exactly happy with this year's sugar snap peas, Oregon Sugar Pod II (OSP). Last year I grew Sugar Lace (SL) and loved them. OSP must have the strings removed, SL are stringless. OSP has a lot of lush foliage which makes the vines heavy so they tend to tear away from their trellis when they're wet or wind blown, SL are nearly leafless and light weight, with lots of tendrils that hang on to their support. On SL, the pods are so easy to find and pick, OSP pods are hidden under all the foliage. OSP blossomed once and gave me 2-3 pickings, then no more blossoms showed up. SL continued blossoming and forming pods until the weather got too hot. The seed catalog states "stringless, but self supporting. Its crisp, sweet pods yield abundantly. Sugar Lace is semi-leafless with interlocking tendrils that prevent the need for staking or trellising. It is also enation resistant for growth during warmer weather. The pods form at the end of its branches for easy picking. This is one you'll want to grow every year. Approximately 68 days to maturity." I found that to be true. So why didn't I plant SL this year? Well, I wasn't going to plant peas at all. I happened to be near the seed rack at the grocery store, noticed the OSP II packets and thought "Why not?", so I bought them on a whim. My bad.

******

Remember my "project" from a couple of weeks ago? When I said one little project always leads to another, and before you know it, it turns into a big job? Well, my big job will start tomorrow. I've been trying to get the patio trim painted, but I guess all that climbing up and down from the ladder last week caused some low back pain that has kind of rendered me useless. Lots of ibuprofin keeps me moving, but very slowly. I think I can get it finished today though. Tomorrow son John is bringing a power washer over, and will be blasting some peeling paint from the eaves of the house. This house has open rafters on two sides, which get really weathered and won't hold paint well.

They look kind of like this, hanging out from under the roof.


John is going to cut the ends off and install a fascia and maybe soffits so they look like this. Much easier to paint, and fewer places for hornets to build their nests.


June 23, 2011 - What Was I Thinking?


What was I thinking when I planted eight parsley plants? I had started two seeds while we were still in AZ, but they were puny little things that didn't look like they were going to survive, so I planted six more seeds after we got home. Of course, every one of them lived, and I couldn't just throw them away. So, what does one do with eight parsley plants in her garden?


Well, one picks a whole pound of parsley.


And one spend half the night snipping and trimming and drying in the microwave, and one still has her largest colander filled with parsley. So she will put it in the refrigerator, and tomorrow she will snip and dry some more. And when she is finished snipping and drying, she will have enough dried parsley to last her a lifetime. And then it will be time to harvest another pound of parsley!